Monday, November 21, 2011

Dreams in a box

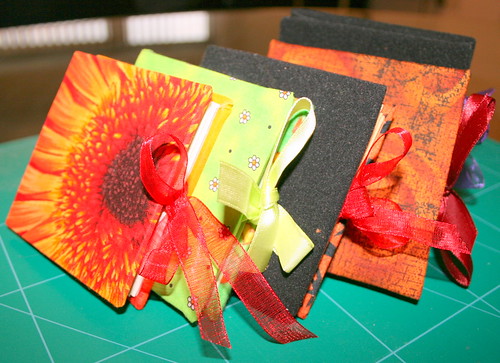
Christmas is coming and my room is full of scrapbook stuff from the table to the floor and all around.  I've started working on some projects and here is one I'd like to share.

This is made from a Maya Road Trinket Box and filled with Webster Papers.  As I don't have the picture of the recipient, I left a blank space for her to fill in with her favourite photo.


Saturday, November 5, 2011

MIA

It's been almost a month since my last post! Sorry that I've been missing in action as I have been really caught up at work and have been shopping online to prepare for my christmas projects!

Here's a card I made last month but did not realise I had not uploaded it.  I love all the fussy cutting on this one and the inside reads "I really envy how you turn back time cos you look nothing but sixteen! Happy Birthday Sweet Sixteen!"  (hence all the upstide down numbers )


Monday, October 10, 2011

iAlter iPhone cover

With the passing of Steve Jobs this week, I was surprised to find myself somewhat aggrieved by his passing and yet also inspired by his life.

So I took out my scratched up cover and gave it a once over and started my alterations.

This is the final result, thanks to my love for experiment. Mr Jobs, in tribute to you.

Sunday, October 9, 2011

One-Sheet Mini Album Link up!

I was going to post up instructions for the Mini Album that I did for Making Memories, but I did a google and found a tutorial done by Avital  in 2008 and it was a spin version as they used Fabric for cover.  I was quite impressed, so I'm going to do a link up here to  her blog!


Avital's Mini Albums


The difference between hers and mine is that hers has a ribbon while mine has a spine!  If you need me to show you a pix or a sample, let me know, I'll be happy to oblige!

Monday, October 3, 2011

WCMD 2011

My first World Card Making Day was played at Pink Paislee.

Here was my card which I submitted for a #1 Bit of color on Neutral base Challenge and #4 Upcycling Challenge.  I did it in half an hour after being inspired by June.  I have to say, it was fun :)

Can you guess what kind of occasion this card is going to be used for?

Thursday, September 29, 2011

Making Memories

Note : This was first featured as Guest Designer Feature on 28 Sept 2011 in Making Memories Blog.

A good friend of mine is getting married very soon and I won't be able to attend his wedding due to work commitment.  I wanted to create a small memento that would be meaningful to him and special to her.  As I love altering items, this is when  I gave a new lease of life to a simple diskette box.  I made a mini album to fit the box, with space in the box to spare for them to keep additional notes or photos.
For this project, I hunted down all the remainder stock of Je T'adore in Singapore and used a total of three 12x12 papers from the Je T'adore paper - Tres Jolie Collage , French Dictionary and Floral Ledger and the brads and accoutrement pack.  Je T'adore is such a gorgeous collection.  The box was covered with French Dictionary trellis pattern paper on the sides,  with Tres Jolie paper in front.  The mini's pages are made from a single sheet of Floral Ledger paper and the covers from Tres Jolie paper.

In any project, a slight alteration can make a big difference in the end results.  I will share a few from this project over here.
1) The box is upcycled from an old diskette box, covered in double sided patterned paper. As the box is transclucent, you can see the pattern inside and the other pattern outside.
  
2) This pair of kissing swallows are from the Je T'adore accoutrement pack. They are originally light pale pink and I covered them in a thin layer of bronze crackle paint.  After the crackle dried, it broke nicely to show the pale pink under the bronze, giving it a bit of the vintage look.
3) Don't be afraid to mix and match. I have here 3 types of roses - a brad, a resin flatback and a paper rose.  See how well they go together?

4) Use words on patterened paper as highlights by boxing them or matting them.  This was from a phrase in the French Dictionary paper.

5) Give dimension to your fussy paper cuttings by painting them with a layer of glitter glue and distressing and curling the edges of the cut.
Hope you enjoyed the tips I shared!

FOLLOW on the right hand side if you want to be notified when the tutorial on how to make the mini album comes up in a few days' time!

Saturday, September 24, 2011

Thru Thick & Thin

BY & I have been married for 10 years, so I was trying to sift through my photos for us together.  Thanks to the many computer crashes, we don't have much! So I took one that we took at the start of the year when I got my iphone 4.  The photo had been deliberately made old and retro by an app and I thought it would be perfect for a 10 yr layout.

Combined with my interest in creating "dirty" layout (which had June laughing at me for liking dirty layouts), I did this vintagey, retroey, non fluffy layout.


I'm not a frequent user of rub-ons, but on this one I applied two different types to get the contrasting letters in the same height.  I also managed to get a number of rub-ons on my fingertips... haha!

I like that imperfect look. 

Materials : Papers - DCVW cardstock, K&Co patterned paper; Washi Tape; October Afternoon rub on letters; CatsLifePress stamp; Maya mists; Tattered Angels glimmer screens.